Canned oysters are inexpensive and easy to prepare; they round out a dinner menu with flare. Oysters are packed with protein, B-12, minerals, and other valuable nutrients, including omega-3 fatty acids and Vitamin D. If you want to used shucked raw oysters (sold in jars), see the variation.
Easy Creamed Canned Oysters
Ingredients
8 oz. can premium oysters packed in water, drained into a liquid measuring cup
1½ T Butter
2½ tsp. potato starch
¼ tsp. salt
1/8 tsp. ground mustard seed
pinch white pepper,
(opt.) pinch paprika, or cayenne pepper to taste
1 tsp. vinegar or lemon juice (or wine)
1—3 tsp. sake or white or rose wine (opt.) or coconut aminos (opt.)
Instructions
Note: The reserved oyster liquid should be about ½ cup, and you will use about half of it. Place 2 ramekin dishes in a warm oven.
- Melt the butter over medium-low heat in a small saucepan.
- Stir in the potato starch and dry seasonings.
- Use a flat whisk to slowly stir in ~¼ C of oyster liquor and thicken the sauce.
- Add vinegar and sake/wine or Coconut Aminos.
- Lower heat to lowest setting. Carefully add the oysters and submerge them under the liquid. Cover the pot and let them rest to heat through for 4—5 minutes. Turn off heat after 2 minutes; do not open lid. Do not stir, as this will break them apart.
- To serve: Use a slotted spoon to gently lift them into two warm ramekin dishes and decant the sauce over the top. (If the sauce is too thick, stir in additional liquid, once the oysters have been lifted out into the serving dishes.)
- Garnish with capers or minced chive, if desired. Serve immediately.
Variation: Using fresh (raw) shucked oysters (sold in 1-pint jars on ice).
While cooking in the butter sauce, raw oysters release a lot of valuable liquid. Adjust the method as follows:
Double the recipe,
increasing the potato starch to 2 tablespoons (not 5 tsp.).
Skip step 4.
In step 6, gently keep the oysters moving to get them evenly cooked and to get the starch and the water released to combine into a smooth “sauce”. The starch may seem clumpy at first but will smooth out once the water is released.
Tip: If you have access to live oysters purchased in their shells, there is no need to “cream” them. Just bake scrubbed oysters for 5 – 6 minutes at 400ºF. After that, they open easily and are ready to eat—immediately. Serve with melted butter.
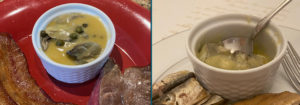
Two Meals with Creamed Oysters